Posts

Showing posts from April, 2008

Seascape Borders

Image
The borders are finally on! The top and bottom borders are 16 inches wide and the side borders are 18 inches wide to make the entire quilt measure 96x85 inches - large enough for a full-sized bed. In the photo, the top border is folded over to keep the quilt top from touching the floor. My design wall isn't tall enough for this quilt. Now I have to figure out what to quilt on those wide borders :D Susan

Seascape Phase V

Image
So, I decided I wasn't done with the center panel afterall! I wanted to get a different view of the beach and add the Sand Island Lighthouse to the quilt. Or rather a loose version of the Sand Island Lighthouse. I added color to it. The original lighthouse is all white. If you were actually facing the Gulf of Mexico from the beach, the lighthouse would be on the left side of the quilt. Since I already had the palm fronds on the left, I put the lighthouse on the right side. If I had planned this all out before starting the quilt it would have been in the right place which would be the left side of the quilt, but this is an improvisational quilt so I took artistic license and moved things around. :) I just realized that this probably doesn't make any sense at all unless you are familiar with Dauphin Island, Alabama. That is my sisters favorite vacation destination. I have dozens of photos of the island - especially the beach, but this is a whimsical version of Dauphin Island with

Machine Embroidery

Today I worked for several hours doing the machine embroidery on the seascape quilt. I'm using Fusion thread by Singer on my domestic sewing machine. This is the first time I've ever used Fusion and I absolutely love it! It's a bit heavier weight than standard sewing thread and rayon thread so it gives a bit more dimension to the embroidery. I'm using a blanket stitch for all the appliques except the tiny pieces like the grasses and the handle on the beach umbrella. So far it looks really nice. I still have several more hours of work on the embroidery before it's done. For the borders I'm planning on a 1 inch inner border using the darkest blue fabric used in the ocean. Then the outer border will be the sky fabric and the darkest sand fabric. If I can get it to work I think I'll use the sky fabric for the upper part of the quilt changing to the sand fabric at the point where the sand starts on the inner pannel. Otherwise I'll add 2 more borders - a bord

Seascape Phase IV

Image
I believe I have the center panel of the quilt done :D See what you think. The appliques are still just pinned on, but I ran out of time and couldn't get them fused on tonight. I decided to add the hills of sand in the foreground to anchor the palm trees. The large palm leaves on the upper right hand side are to further push the composition into the distance and to balance the design. Once I get the appliques fused down, I'll machine applique around them then add the borders, quilt it, bind it, and it's ready! Susan

Seascape Phase III

Image
Here is the latest on the Seascape quilt. This evening I worked on the the layout of the appliques and created the palm fronds for the palm trees. Everything is still pinned in placed waiting to be fused. The rest of the greenery is waiting to be created and applied. Susan

Studio Changes

Image
I spent the weekend moving things around in my basement studio to make it more user friendly. My batting rack was blocking the design board so I had moved it infront of the storage shelves temporarily. I finally got around to moving that so the shelves were accessible again. I also cleaned off the drafting table so I can use that for cutting fabric. The walls still need drywall or some other material to finish them off, but that will be a summer project - or a fall project depending on how busy we are this summer. In the meantime, I plan to staple up bed sheets to cover the insulation. The basement is way to dreary for me and I'm finding myself avoiding quilting because of it. Time to do a quick fix on those walls! I took some time last night to work on Barbara's seascape quilt again. I took it down off the design wall and trimmed it up. I know it looks trimmed in the photos I've posted, but that is because I cropped the photos :) It's squared up now. Of course I had to

Seascape Phase II

Image
I've spent a couple of hours today working on Barbara's Seascape quilt. The palm tree and cloud appliques where drawn and fused onto fabric yesterday. Today I cut them out and chose the fabrics for the house and the beach umbrella and fused the web onto those fabrics. Next came assembling the house and fusing it into once piece and the same with the umbrella. Then I pinned everything onto the quilt background where I thought they would look best, stepped back to get a better look, then repinned almost every piece-ha! This is what I have as far as placement at this point. That may change as I continue to add to the quilt. I'm planning on a beach bucket, beach towel and maybe a pair of flip-flops if I can draw them small enough. I still have to do the greenery, too. Susan

Seascape Phase I

Image
Yesterday I played around with the fabrics for the Seascape quilt trying to decide how to line them up for the main part of the quilt - the sky, sea, and sand. The first photo shows the sand colors in reverse of what I decided to do in the end. The reason being is that the sand closest to the water line is usually darker because it is wet. So I reversed the fabrics this morning when I was stitching the colors together. I'm not certain about the straight line at the junction between the sand and the water. I may change that since it won't be hard to do. I just need to live with it for a day or 2 before I decide - unless you want me to change it Barbara. The straightl line at the sea and sky junction is what you see in nature so I'll leave that. I drew the design on freezer paper - long sheets 45 inches long and 18" wide taped together to make a sheed of paper approximately 54x45". I then drew lines for the horizon and the junction between the sand and sea. The

Seascape

Image
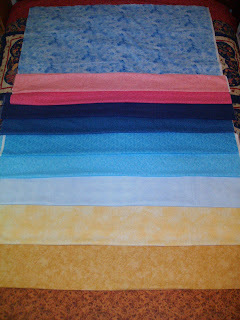
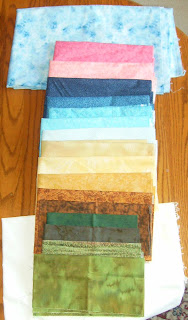
Here are the fabrics I chose for a seascape quilt I'm making for my sister, Barbara. This is a tease for her :) She'll have to wait for the quilt to be done to see how they all come together - unless I decide to post photos of the quilt in progress. I've placed the fabrics in order that they'll appear in the quilt starting with the sky fabric on the top, then the horizon fabrics (the pinks), the ocean fabrics (blues and teals) and the sand fabrics (the beiges), the tree trunks (the browns), and the green fabrics for greenery. I'll be making clouds out of the pinks and darker blues, too. I'm still working out the pattern, but I'm getting my inspiration from Ginny's quilt as well as other quilt artists whose work I've been studying the past week or so. I think I purchased enough fabric to make another, smaller quilt too. Barbara's quilt will be a bed quilt and will be used, so I want it to hold up to washings. I'll be machine piecing most of

Lily and Orbit

Image
Monday I finished Orbit. It's another applique abstract quilt. The appliques are all cut from one piece of hand-dyed fabric and appliqued onto a black cotton piece of fabric with a copper colored cotton thread. I quilted the background in black Signature 40 wt. cotton thread using piano keys in the outer border, McTavishing in the inner border and pebbles between the applique. The quilting on the appliques is with Signatures Woodlands 40 wt. cotton thread. I used straight line quilting in the outer frame pieces and one of the inner frames in the lower right-hand corner. I quilted with the "Lofting" design in the remaining appliques. I finished binding both Lily and Orbit yesterday using tips from Sharon Schamber. I was really pleased with the results. This technique takes longer, but the end results are well worth the extra time. I didn't have any "creeping" that I usually have with applying binding. Even using an even-feed or walking food, the creeping is a

Lily

Image
Here is Lily. This is a small art quilt that I appliqued a few years ago, but just finished quilting it this evening. It is 25 1/4" x 31 1/2". The appliques are all hand-dyed fabrics fused to a solid black commercial cotton fabric. I stitched the appliques with a gold metalic thread on the edges. The quilting thread is all cotton by Signature. The quilt is an abstract design I created while doodling in a theme notebook. I took the idea of a lily and disected it into it's anatomical parts. I have a couple other doodles with the same "disecting" theme in that notebook. One day I'll make quilts from them. So for the quilting - the outer border is McTavishing with black thread. The red-orange appliqued border is a ribbon quilted with Woodlands variegated thread. The inner border is formed strictly by the change in quilting designs. I used a tiny 1/4" piano key quilting pattern for that border. Pebbles are quilted between the petals, and a swirl-type des

Wild Cats Complete

I took the Wild Cats quilt off the machine this morning and popped it into the washer to run through the rinse cycle. I ended up marking the setting triangles with a glow pencil. It's a crayon textured pencil that glows in the dark - or at least under a black light. I marked the design on the fabric with the pencil then switched the white light bulb in the machine with a black light. I had to turn off the overhead lights in order for the black light to show the pencil marks, but it worked great! I was able to quilt the design without any trouble. The only thing is that the pencil has to be washed out. One thing though......batik fabrics need to be prewashed - MORE THAN ONCE! I always prewash my fabrics - always and every single piece I buy. The Wild Cat quilt has one piece of brown batik fabric in it and that's the sashing separating the cat blocks. I did prewash that fabric, but only once. When I took the quilt out of the machine to dry it, the batik had bled into the white fa

New Quilts

Image
Here are a couple of photos of the new quilts I'm working on. This one is called Wild Cats. It's a pattern I got out of a quilting magazine about 4 years ago. In fact I appliqued and pieced it 4 years ago while I was recovering from surgery. It's just now on the quilting machine. Here it is on the machine. I had to make freezer paper templates of the quilting design for the end and setting triangle pieces. The fabric is so busy that I couldn't see my chalk markings. But then the freezerpaper templates kept getting caught in the hopping foot. So I made a plastic template and am tracing around that with a water-soluble marker. That seems to do the trick. This quilting motif is called "Peacock" and is my original design. Here is the "Bird" quilt I've mentioned before. I've named it "Flight at Sunrise" - appropriate, huh! It's supposed to be an impression of birds taking off at sunrise. I just finished piecing it this morning. It

Snail Trail Photos

Image
I finished the binding on the Snail trail quilt this morning. It measures 65 x 65 inches square.

Snail Trail

The Snail Trail quilt is on the machine and I hope to finish it today. I decided to do freehand feathers in each block. Completing one row of 4 blocks is taking me an hour and a half. I'm down to the last row of 4 blocks though, so I should have it completed today.....IF the thunderstorms hold of! We're expecting more today. It rained during the night but the big storms are expected later. Once I finish the Snail Trial, I'll be loading my Lily quilt. It's a very small wallhanging and shouldn't take long to quilt - famous last words! Mot got her seeds planted the other day and yesterday we watered everything. So far she hasn't lost interest in them. I'm hoping that will continue while we're waiting for the plants to sprout. Everything we planted is supposed to sprout within a week. I'm running out of ideas for social studies for Mot, so yesterday I went on-line and did some research. I've decided to do a unit on transportation since she has

Gardening

No rain today!!!! The ground is soooo saturated that the back yard squishes underneath your feet when you walk on the grass. I've told Mot to wear her boots when she goes outside to play! We've started a plant unit in homeschool this week. Last night I went to Wally-world and bought a Rosemary plant and a Lavender plant along with a couple of Lithodora's and a Bellis (Galaxy Rose). I wanted to replace some dead perineals in the front yard with herbs - therefore the Rosemary and Lavender. Then Mot wanted flowers so I bought the others. The Lithodoras are a deep blue - almost a cobalt blue. I think they are a ground cover. The Galaxy Rose won't get very tall either, but it's a pretty pink/red flower with feathery petals and a yellow center. Right now they are all on the window sill and the top of one of the book cases until the weather warms up and the ground dries out enough to plant them outdoors. Today we planted seeds. I had some thyme, basil, cilantro and