Posts

Showing posts from March, 2009

Charity Quilt

Image
This is a quilt I completed for my quilt guilds charity program. We make small quilts to give to the local foster children. The blocks in this quilt were made by another quilter. I just put them together and quilted the quilt. I used an overall pattern called "Swirl". The photos came out blurry for the 2nd charity quilt I completed so I'll rephoto that quilt and post later.

Painted Quilts

Image
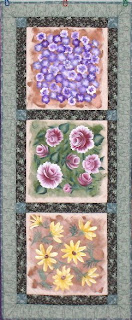
The quilt above is one of several painted quilts I completed a few years ago. I painted the background and let it dry, then painted the flowers and leaves using a "one-stroke" technique. After the pieces dried, I squared them up and added the borders. The paints are acrylic craft paints mixed with textile medium. I've got the urge to do more painting on fabric, but this time using Setacolor paints and painting fabric for my landscape quilts. I have to get the paints as well as complete some other projects first. "Flight at Sunrise" is my first priority in my own list of quilts to complete at this point. Now that I have some hand-dyed fabrics to use for borders, I just need to set aside the time to work on it. The wholecloth quilt "Arabesque" is entered into IMQA's Machine Quilter's Showcase. I decided to hold off on entering "Lily" for now. I think I'll enter it in the Missouri State Fair first, and then decide whether or not to e

Two Projects

Image
This quilt top is the Mystery quilt that we are making on Learning Fiber Arts. I just finished the borders this afternoon. I'm not sure I'm happy with the 9-patch blocks in the outer border, but I'll leave it as is for now. Arabasque is being blocked! I rinsed the water soluble thread and blue pen out this morning and blocked the quilt on my bedroom floor. I had to chase the dog off of it once. I had forgotten he was in the room and he decided he had to walk across the quilt to get to me! He only got 2 paws on the quilt before I stopped him. Of course, he left dirty footprints behind (he had just been outside and the ground is muddy) and I had to clean the spots. Luckily they came out easily. Tomorrow I'll trim it and start the binding. I have to get it photographed and the entry form sent in to arrive by Friday the 20th. I'll be cutting it close! I have another small wallhanging that I have been contemplating entering into the show, too. I haven't made up my m

Quilting Complete

Image
I'm sooo happy! I finished the quilting this evening on my wholecloth. This is a photo of it hanging on my design wall in my studio. I'm too tired to block it tonight, so it's just hanging there and hopefully will be in a good spot to keep clean until I can rinse it and block it tomorrow. It shrunk about 1 1/4 inches in width after all the quilting was completed. Not too bad. The photo above is a close-up of one of the corner motifs. You can also see where I added the straight-line stitching inbetween what I had already quilted in the outer border. Now the quilting is 1/4 inch apart. The quilt is hanging pretty straight even right off the machine. I'm hoping that means it will block well and be easy to bind, and will hang straight once it's all done.

More Wholecloth

Image
I found some time the past 2 days to work on my wholecloth. I have the McTavishing done in the larger sections of the quilt as show in this photo. Here is another view showing the McTavishing. I used a micro-stipple in the narrow area between the corded border and the scroll motifs in the outer border. This photo shows the McTavishing I started as I move more towards the center of the quilt. I micro-stippled in the loop areas. You can probably see where I wrote the word "micro" in the areas so I wouldn't get confused and quilt those areas with McTavishing. I still have lots of hours to go with quilting, but I'm happy to see that I'm making some progress. I hope to have it done, blocked and bound by Monday so I can photograph it and send in the entry forms for Machine Quilters Showcase . The Showcase is May 11th-16th and I have signed up for several classes this year. I'm really looking forward to attending. I'm not expecting my quilt to place, but it'

Kreativ Blogger

Image
Millie has nominated me for the Kreativ Blogger Award! Thank you so much Millie. This award is meant to be passed along and brighten another blogger's day. When passed along, it is asked that it be passed to 7 more bloggers that you feel are "Kreativ" and that you list 7 things that you, the award recipient, love. It is so hard to narrow down the bloggers I follow to only 7, but here goes: Janet - a wonderful fiber artist Shirley - a tireless fiber arts instructor and owner of a fiberarts teaching group Sandy - another quilter with limitless talent Angela - whose talent covers many areas of fiber arts from BOM's to PC's to Art Journal quilts, and she also has a Rhapsody quilt in progress! Debra - who has a beautiful miniature quilt posted and don't forget to check out all the BOM links on her sidebar Gudrun - a fellow professional longarm quilter with tons of talent Gina - another talented quilter from the UK Please checkout these ladies' blogs -

Another Longarm Machine

I don't know how I forgot to add KenQuilt to my post about longarm machines, but I did. They have a full line of longarm machines, too. You can reach their website here .

Arabasque Continued

Image
The outer border is straight-line stitched 1/2 inches apart. I'll go back and quilt inbetween these lines later on after more of the center of the quilt is quilted. The lines will then be a 1/4 inch apart. I quilted just enough to prevent puckering of the borders as well as the center of the quilt. The more you quilt the more the quilt pulls in. You can see some pleating/wrinkles underneath the McTavishing section as well as below the piano key border. This is normal, but it isn't enough pleating that it will cause problems. Here is some of the McTavishing. My week of quilting on this wholecloth looks like it's going to turn into 2 weeks. Several things have cropped up that have cut into my quilting time - like freezing cold weather! Since my studio isn't finished, it gets really cold when the temps drop below 40. We've had temps in the teens for a couple of days this week until Wednesday when it was in the 70's :D Thursday the girls and I went on a nature hik

Another Longarm and a Customer Quilt

Image
Here is a website link for a rather new longarm machine Innova . I have never tried this machine, but check out the website. I've heard some good things are being said about this machine. This is Lorraine's quilt. She used some of the flowers in the fabric, cut them out and hand appliqued them to the border adding a bias vine to connect them. If you click on the photos you can see the detail a bit better, especially in this first photo. I quilted feathers and straight line quilting into the body of the quilt. I echo quilted around the flowers in the border using Signature 100% cotton thread in black. The quilting in the appliques was done with colors matching the flowers and leaves as closely as possible. All was a Signature brand 100% cotton thread. I used Hobbs 80/20 Heirloom black batting. It quilted up very nicely - just like the natural colored 80/20.

Longarm Machines

Image
Jen asked me a few questions about my longarm machine - or longarm machines in general. This is a photo of my Gammill classic taken a couple of years ago at our last home. My machine is non-stitch regulated which means that I control the stitch length by how fast or slow I move the machine. One of these days (I keep telling myself) I'll invest in having the stitch regulator added, but after almost 8 years of quilting with this machine, I'm pretty comfortable with it the way it is. It sits on a 14 foot track table, but you can also buy them in a 12 foot length and even have them customized to fit your space. The Classic is the midrange longarm in length in the Gammill line. They make one smaller - the Premier, and 1 larger - the Optimum. My Classic has a throat space of 26" wide x 10" high. That gives me about 21" of quilting area. I don't believe you can buy a non-stitch regulated machine from Gammill except for the Premier now. I find my machine easy to mo

Arabasque

Image
This is my wholecloth quilt that I've titled "Arabasque". The designs were taken from a Dover copyright free book of Victorian Designs. I chose 3 designs and they were all labeled "arabasque" - hence the name of my quilt. The photo above is the center top of the quilt. I just starting to quilt around the cutaway trapunto. The stitching you see is the water soluble thread. I used Vanish Extra. The photo above is the inner corner design after quilting part of it. This is the outer corner design after quilting. I am using So Fine thread in the top and bobbin in color number 401 - white. I'll include some micro stippling (very little), McTavishing, and piano key quilting. I still need to chose one more background filler, but that will come to me as I work on the quilt. I'm really enjoying quilting on this quilt. It isn't very large so it shouldn't take more than a week to complete even with the heirloom background filler. Come back and see more p